
Improve Your Blog’s Click-Through Rate with Rel=author
Maybe you’ve noticed that since the beginning of the year, search results have gotten a little more visual. The long story here is that in the last few years, Google and the other search engines have started adding support for more types of rich snippets. Rich snippets can take a lot of different forms.
Two of the most well-known are probably Recipes and Video (shown below).


Basically, a rich snippet is a section of code that you can add into your website that can make your results show up with some additional visual aid like stars, a video, or a picture. Your page has to meet certain criteria in order to be eligible (you can read more about the types of rich snippets and criteria on Google’s site), but if it does, it’s just a matter of adding in the supported code.
Though Google has explicitly said there is no SEO benefit from using rich snippets, there is a significant increase in Click Through Rate. A variety of retail companies reported a 30% increase in traffic just from utilizing structured microdata to add rich snippets to their site.
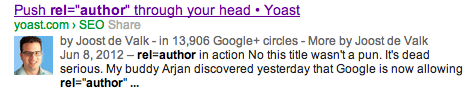
This post, however, is going to talk specifically about a more recent google implementation called rel=”author” and how to implement it on a WordPress Blog. Implementing the rel=”author” tag lets you connect your blog or webpage to your google+ page so that when your blog posts come up in the search results, you’re smiling mug can show up to the side.

Implementation can get a bit technical on some sites, but if you’re using WordPress, as usual, there’s a plugin for that! There’s a variety of different plugins that can handle this, but I reccomend using this rel=”author” plugin from Dempsey Marketing since it can handle sites with multiple authors. Before you install the plugin, be sure to create a Google+ page with the image you want to display. You’ll also need a link back to your site in the contributor section of your Google+ profile and make sure that’s set to public and a gravatar profile picture using the same email as you’re user account on WordPress.
![]()
Once you’ve got your Google+ Page set up properly, all that’s left is to follow the directions on the plugin page and you should be good to go. The plugin also uses whatever you put in the Biographical Info section of your User Profile so it’s worth it to add any social profiles or important links in there.


